(Sorry nwn1 users, at the moment this section is only explained in nwn2. You can still follow along, but the conversation scripts will need to be written from scratch as these files described in this section do not exist in nwn1, you can download the nwn1 version of this tutorial and look at the conversation scripts.)
It is now time to give our player a way out of the chest... unfortunately (evil grin). Here is what I have in mind.
There will be a pile of bones on the floor, when the PC clicks on them a conversation will start and the player will be given an option to examine the bones. Upon examination, the PC will see a pendant and that pendant is missing a stone. Else ware inside the chest the PC will find a Ruby, this is the ruby that belongs to the skeletal remains. If the PC places the stone in the pendant, the pile of bones will animate and come to life. Talking to the Skeleton, the PC will be able to get out by answering a riddle for the skeleton.
Sound easy? Actually it will be quite simple and we will only write one new script for finding the ruby. All the conversation scripts you will need are done for you, I'll show you how but first we need to set up some props inside the chest.
Open your "tutorial_4" module and hit "Save As" and save it as "tutorial_5".
Open the Area "inside_chest". Got to Blueprints and select triggers. Paint down a small generic trigger someplace inside the chest. This will be the trigger we use that will allow the PC to find the ruby. Now paint down a placeable corpse, under Blueprints > Placeables > Manmade Props select "Corpse 03" and paint it down someplace in the chest. Select the corpse you just painted and in the properties, change the following;
Static = False, (makes the placeable subject to scripts and manipulation)
Usable = True, (makes the placeable selectable by the PC)
Default Action Preference = Use, (makes the cursor display the "use" icon)
Walkable = True, (When baking the area, the placeable does not "cut-out" the walkmesh, the spot the placeable is setting on remains walkable.
Localized Name = Pile of bones (The name displayed when hovering the cursor over the placeable)
Tag = BONES
Now we will need a real skeleton to spawn in later. In the Blueprints > Creatures > Undead, right click on "Skeleton Warrior" and select "Copy Blueprint > module". This will add a new blueprint to your Undead list, select your new one in that list, it will be added to the bottom of the list and it will be in BOLD print, which makes it easy to identify added or changed content. Change the following in it's properties.
Resource Name = bones_2, (The blueprint ResRef)
Tag = BONES_2,
First Name = Bones.
Faction ID = Commoner
One last thing to make, the Ruby. This will be the stone that fits the pendant on the pile of bones. In Blueprints > Items > Miscellaneous > Gems right click on "Ruby" and select "Copy Blueprint > Module". Again this will add a item to your Gem list. Select the new item and change the following in the properties window.
Resource Name = ruby
Localized name = Ruby
Tag = RUBY
Ok, now we are ready to make the script for the trigger so the Player can find the ruby we just created. Also note that ever object that we just created I changed the tag, as well as the ResRef. This should be standard practice to keep your new items identifiable from the standard items. Because I am going to concentrate on Conversations in this section, I won't go into great detail for the script that goes on the trigger. But lets cover the concept of the script and hopefully you will try to create the script yourself before you copy and paste.
When a PC enters the trigger, Clear the players actions, send them a message of "You found something", and assign the action of picking up an object and create a ruby item in the players inventory.
Right click in the script window and select "Add", Goto the script window again and right click on the script you just added (probably named "Script1") and select "Re-name". Re-name the script to "t_ent_spot_ruby". The t is for "trigger", ent is for the OnEnter and spot_ruby tells you what the script does. If you want to try and write the script yourself, I'll help you get started, then minimize this window, return when you think you have it or if you give up. In the script window enter "void main()" <enter> "{" <enter><enter> "}" click in the blank line between the open and close scope and start your script. Because this is an OnEnter script, we will want to define a variable to hold the GetEnteringObject(); object.
Your completed script should look something like this;
void main()
{
// Declare variables
object oEnter = GetEnteringObject();
FloatingTextStringOnCreature("You have found something",oEnter);
AssignCommand(oEnter,ClearAllActions());
AssignCommand(oEnter,ActionPlayAnimation(ANIMATION_LOOPING_GET_LOW));
CreateItemOnObject("ruby",oEnter);
DestroyObject(OBJECT_SELF,1.0);
}
A couple things I want to point out in the above script. Notice that there is no check for making sure the entering object is a PC. Normally you would want to include one but no big deal for this little tutorial mod. For completeness, under the variable declarations of oEnter, add in the line if(!GetIsPC(oEnter))return;
Also, at the end I have a DestroyObject call. This destroys the trigger object so it only fires once. a simple little trick for single player mods. Obviously, if this was a Multiplayer or PW you probably won't want to do this.
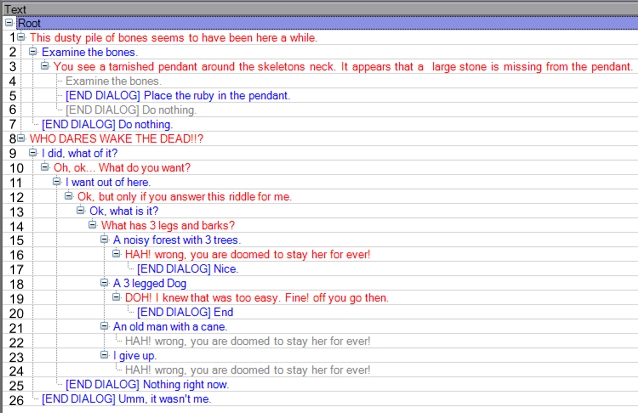
Now on to the conversation. Goto "File > New > Conversation", then open the conversations TAB and right click the new conversation, probably named "conversation1". rename the conversation to "bones". Here is the convo we are going to build. Notice there are Red lines, Blue lines, and Gray lines (the numbers were added by me for ease of explanation).
The red lines are the object or NPC talk lines. The blue lines are the PC response lines and the gray lines are "linked" lines. Also note that some lines have the same right hand justification. For example line 1 and line 8 have the same justification or "response node", as does lines 4,5, and 6. When the lines are red, a NPC node, such as lines 1 and 8, only one of these nodes can be displayed at one time, and if the lines are blue, a PC response node such as lines 4,5,6 multiple lines are displayed. The words inside brackets [END DIALOG] do not show in the actual conversation but rather serve as information for us. This means if that node is selected, the conversation ends.
I am going to use this same conversation file for both the placeable pile of bones as well as the Skeleton NPC. This is easy to do and I'll show you how. First create the conversation as above. First click on +Root and then click "Add" from the tool bar. A Text box appears for your text to be entered, enter Line 1. Notice that the "selected" text node is now the line you just answered. This is a bit of a pain if you are adding several lines of text on the same node. Re-select +Root and click "Add" again and enter line 8. Select line 1 and add line 2 and line 7. Select line 2 and add line 3, and finally, add line 5. Now to add in the Links (the gray lines). Select Line 2 and right click on it and select "Set Link Destination", now select line 3 and right click select "Insert Link". The a copy of line 2 will be added to that text node and be gray, indicating a link. repeat the process for line 7. Use the "Move Up" or "Move Down" menu buttons to arrange the nodes as show above. Continue the process for lines 8 through 26.
Once you have the conversation built, we need to add in out condition scripts and action scripts. Condition scripts check for a "condition" to be TRUE. Usually checks for a variable to be set to 1 or some other number or even 0, or possibly a item in the PC's inventory. A Condition script MUST always return TRUE or FALSE to the conversation file. A action script is a script that causes a action, event to happen like jumping the PC, rewarding xp, and all sorts of things. As mentioned, we will use this same script for both the placeable and the NPC. Line 1 starts the conversation for the placeable and line 8 starts the convo for the skeleton NPC. Because these lines are on the same node, we will need a "condition" script to determine which of the 2 lines (1 or 8) to display. We only need a condition on line 1 because if the condition fails, or is FALSE then line 8 will display by default.
Hint: Always leave the last line of a dialog node with NO condition attached, unless you have a specific reason to include a condition script on every text line of a single node. This will help in trouble shooting. For example, lets assume the NPC could speak one of 3 different lines, each line has a condition script attached. if something is wrong and all conditions return FALSE, the conversation ends. This usually causes one to think there is something wrong with the conversation file itself. If the last line has no condition, then instead that last line will always display - causing you to think "Something is wrong with the previous conditions and/or what those conditions are checking - which is most likely the case.
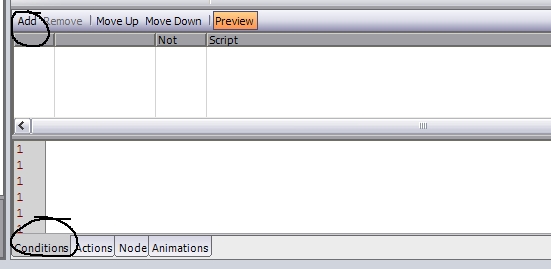
Select line 1 and make sure the "Condition" tab at the bottom of the conversation window is selected. and click "Add" in it's tool menu.
In the script box, click the drop down arrow and select the script named "gc_local_int" and then click the "Refreash" Button. You should see a bunch of boxes appear for inputting script parameters.
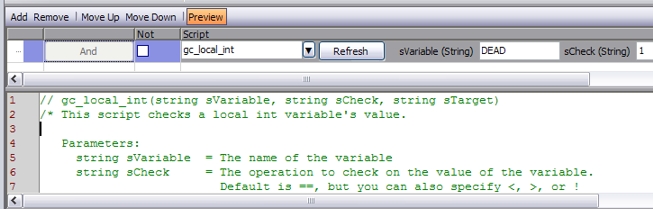
Enter the information as above, for sVarialbe (String) enter DEAD and for sCheck(String) enter 1. You can see what these parameters mean in the preview window. DEAD is the name of a variable we will check and we want that value to equal 1. This variable does not yet exist and in a little bit I will show you how to set it on the placeable. Now because of this condition, line 8 won't display unless line 1 returns FALSE. Ok, now we are going to side track a bit and set up this variable on the placeable pile of bones.
Go to your inside_chest area and select the placeable corpse you painted down earlier. In the properties window, click on the "variables" box and click the little "..." button. In the window that opens, click "Add". You should have a window that looks like this;
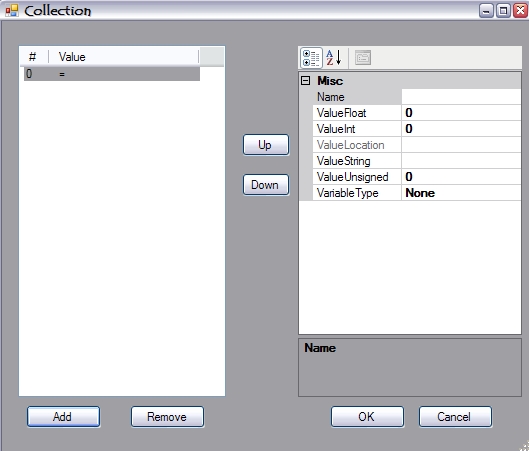
Always start with "Variable Type", otherwise when you select the variable type, any previous information you enter will be cleared. For Variable Type, select "Integer", for "Name" enter DEAD, and for "Value Int" enter 1, click "OK". Now the variable DEAD is set to the value of 1 on the placeable corpse. This is the same int value that will be checked by the conversation condition script we just added to the conversation.
While we are here in the corpse properties, go ahead and select the "Conversation" box (under Behaviour) and enter "bones" for the conversation file name. Now go down to the scripts section and in the OnUsed box, enter "x2_use_placeable". This is the default script that will start the conversation when a PC clicks on the placeable object.
Now go back to your conversation bones file. Select Line 5, ("Place the ruby in the pendant") we need to add a condition to this line as well. We don't want this option to appear to the player unless the PC actually has the ruby in their inventory. If the player does not have the ruby, we only want line 4 and 6 to appear. Make sure the "Condition" tab is selected and click "Add". Insert the script "gc_check_item" and click the refresh button. You will see 2 parameters we need to enter, sItem (string) and bCheckParty (Int). For sItem, enter the TAG of the ruby gem stone we created earlier, "RUBY" (without the quotes). bCheckParty is for checking the entire group. In this case we only need to check the single player so leave it 0 or FALSE. In the case we want to know if anyone in the party has a certain item, we would set that to 1 or TRUE. This script will make line 5 either display if the PC has that item, or not display if the PC does not have that Item.
Next we need to add several "Action" scripts to this line. If the PC selects this line we want to make the PC play an animation of "Get Low", take the ruby from the PC, apply a visual effect, destroy the pile of bones, and spawn in our skeleton NPC. Click the "Action" tab at the bottom and click "Add". For the first script, select "ga_play_animation" and click "refresh". Again you will see a bunch of parameter boxes appear. Hint: You can expand the right column by placing the cursor at the end of the column header until the curser changes to a left|right arrow. Left click and hold and drag to the right. repeat as necessary. The first box is sTarget(string), This parameter can vary from script to script, some scripts have the OWNER of the conversation set as default and other scripts have the PC Speaker set as the default. To be safe, I suggest always including this string to specify, and be sure of, which object is the target object. Unfortunately, the script notes don't really tell you what to enter into this box. The notes for this particular script says "sTarget - tag of creature to play animation - default is conversation owner." Well that's fine, but what if you want the PC speaker? There is a KEY that can be entered to specify what object you want, that KEY is the dollor sign "$" and then a key word. They are as follows;
$OBJECT_SELF = OBJECT_SELF (conversation owner)
$OWNER = OBJECT_SELF (conversation owner)
$OWNED_CHAR = GetOwnedCharacter
$PC = PCSpeaker
$PC_LEADER = FactionLeader (of first PC)
$PC_NEAREST = NearestPC (owned and alive)
$PC_SPEAKER = PCSpeaker
So because we want the Player to do the animation, we need to enter $PC in the sTarget box. This will ensure that the PC speaker does the animation. The next box is aAnim (int), this is the actual number of the animation we want to instill. To get the actual number, we need to go to the script window, click "Globals" and enter "ANIMATION" in the filter box. This will display a list of animation constants. The animation we want to play is the ANIMATION_LOOPING_GET_LOW animation. Selecting that animation will show the notes for it in the notes box of the script editor. You will see that the ANIMATION_LOOPING_GET_LOW animation has a integer value of 12. Enter 12 for aAnim. The next 3 parameters are , fSpeed (float), fDurationSeconds (float), and fDelatUntilStart(float). These are pretty self explanatory and explained well in the script notes. Enter 1 ,1 and 0 respectively.
Click the "Add" button again to add another script to this same text line. Locate and attach the script "ga_effect" and click "refresh". Note: If you haven't noticed, "condition" type scripts start with "gc_" and "action" type scripts start with "ga_". Also, after selecting a script to use - read the comments in the preview pain. Those will help guid you as to what values can be placed in the parameter fields. This script can handle different types of effects, the one we want is Visual. So enter "Visual" (no quotes) in the sEffect(string) box. Next enter 219 for sParams(string), this is the VFX_FNF_SUMMON_CELESTIAL type visual effect. For a list of visual effects, goto "View > 2dafile" and select "visualeffects". Note that you will want to choose an effect that has a file name listed in the Imp_HeadCon_Node. Not all visual effects from NWN1 have a visual anymore. Not sure if this is a bug or simply not complete. sDeration(string) is "I" for Instant, and sTarget(string) is $OBJECT_SELF. We want the effect on the conversation owner, not the PC.
Now we need to create the living skeleton, so click "Add" once more and select the script "ga_create_obj" and click refresh. The object type we are creating is a creature, so enter C for sObjectType(string). The sTemplate(string) is the ResRef, or Resource name of the object we created in the blueprints. Enter "bones_2" in this box (no quotes). If that is not your resource name, then look at the properties of the skeleton creature we created earlier and enter it's resource name. Next is sLocationTag(string). The script notes say that this parameter need to be; Tag of the waypoint at which to create the object. This can actually be any object, not just a waypoint. So, instead of adding another object to the map, we will use the location of the pile of bones placeable, so enter it's tag instead, BONES. We want to delay the creation just a bit so the animation plays, so for fDuration(float) enter 0.6.
Now we need to destroy the placeable pile of bones and the ruby. So, finally click "Add" once more and select the script "ga_destroy" and click refresh. This script allows you to destroy multiple objects by listing their tag so we only need this script once. sTag(string) is the TAG of the objects you want to destroy which is the Pile of Bones TAG and the ruby TAG, so enter BONES,RUBY make sure there is no space between the comma. Because we delayed the creation by 0.5 seconds, we need to delay the destruction of the pile of bones as well. If the pile of bones is destroyed - the scripts go with it therefore the skeleton would never be created. So for fDelay(float) enter 0.7.
One more line to cover, select line 20, this is where we will Jump the PC back out of the chest. In the Actions Tab, click Add and select the script "ga_effect". We want to send the PC out in style, so we will use an effect here also. For sEffect(string) enter Visual, for sParams(string) enter 74, and for sDuration(string) enter I. This time we want the effect to be placed on the PC, so for sTarget(sting) enter $PC.
Now we need to jump to PC out of the chest to a different area, but first open the "outside_chest" area and go to "Blueprints > Waypoints > Empty" and select "Waypoint". We will need to add a waypoint for the PCs return to this area. We could use the chest as a target to jump to however the chest is inside our trigger. The entering PC would again jump back inside the chest. Scripters challenge: Make the trigger a "do once" type trigger preventing the trigger script from triggering a second time. Use the chest as the target object to jump out to. Place the waypoint anywhere in the area outside the trigger. In the properties of the waypoint, change it's TAG to RETURN. Sice we are already out side the conversation editor, lets attach the conversation to the Skeleton we already created. Go to "Blueprints > Creatures > Undead> Bones" and in the properties under "Conversation" enter bones. No go back to your conversation line 20.
Add the script "ga_jump" to the conversation line 20 and click refresh. For sDestination(string) enter the waypoint TAG that we just created, RETURN. sTarget(string) is the PC, so enter $PC for sTarget. We want to see the effect, so lets delay the jump a bit by setting fDelay(float) to 1.5 Save your module and give it a test run. Feel free to ask questions on the J_forums.
This completes this tutorial, I hope it was intuitive for you as well as fun to create. This completed tutorial module is available for download; for NWN1 or NWN2.